
The first time I made a Brownie Refrigerator Cake, it happened because I completely forgot to bake dessert for a family dinner. I had brownies sitting on the counter from the night before, a tub of whipped topping in the fridge, and exactly one hour before everyone arrived. What started as kitchen panic somehow turned into one of the most requested desserts in my house.
I still remember sneaking a spoonful straight from the fridge while the layers were setting. The brownies had softened just enough, the cream turned silky and cold, and the chocolate flavor tasted even richer the next day. Since then, this cake has become my “I need something impressive without losing my mind” recipe.
The best part? It looks like you spent hours on it. Nobody needs to know you mostly stacked layers and let the refrigerator do the work.

Why You’ll Love This Recipe
- No fancy decorating skills required — the layers do all the work
- Perfect make-ahead dessert for parties and holidays
- Rich, fudgy, creamy, and cold all at once
- Great way to use leftover brownies
- Easy to customize with toppings, cookies, or fruit
Ingredients List
For the Brownie Layer
- 1 batch baked brownies (8×8-inch pan)
- Homemade or boxed mix both work
- 1 cup semi-sweet chocolate chips
- 2 tablespoons butter
For the Cream Filling
- 2 cups heavy whipping cream
- 1/3 cup powdered sugar
- 1 teaspoon vanilla extract
- 8 ounces cream cheese, softened
For the Chocolate Pudding Layer
- 1 package (3.9 ounces) instant chocolate pudding mix
- 2 cups cold milk
Optional Toppings
- Chocolate shavings
- Crushed chocolate sandwich cookies
- Mini chocolate chips
- Chopped walnuts or pecans
- Fresh strawberries
- Chocolate syrup or caramel drizzle
Helpful Substitutions
- Swap cream cheese with mascarpone for a softer, slightly richer filling
- Use vanilla pudding instead of chocolate for a lighter flavor
- Gluten-free brownies work beautifully here
- Coconut whipped cream works for a dairy-free version

Step-by-Step Instructions
1. Bake and Cool the Brownies
Prepare your brownies according to the package or recipe instructions in an 8×8-inch baking pan.
Bake until the edges look set and the center still has a slight softness. For most brownie mixes, this takes about 28–32 minutes at 350°F (175°C).
Do not overbake them. I made that mistake once, and the refrigerator cake turned dry instead of fudgy.
Let the brownies cool completely. If they’re even slightly warm, the cream layer will melt and slide everywhere.
2. Make the Chocolate Topping
Add chocolate chips and butter to a microwave-safe bowl.
Microwave in 20-second bursts, stirring between each one, until smooth and glossy. This usually takes about 1 minute total.
Spread a thin layer over the cooled brownies.
Pop the pan into the refrigerator for 10 minutes so the chocolate firms up slightly.
This little chocolate layer acts like a barrier and keeps the brownies wonderfully fudgy underneath.
3. Prepare the Cream Filling
In a large mixing bowl, beat the softened cream cheese until smooth.
Add powdered sugar and vanilla extract. Mix again until creamy.
In a separate bowl, whip the heavy cream until stiff peaks form. I use my old hand mixer for this because hauling out the stand mixer feels unnecessary for one dessert.
Fold the whipped cream gently into the cream cheese mixture.
Take your time here. If you stir too aggressively, the filling loses that light mousse-like texture.
4. Spread the Cream Layer
Spoon the cream mixture over the chilled brownie layer.
Use an offset spatula or the back of a spoon to spread it evenly all the way to the edges.
Refrigerate for 15–20 minutes before adding the pudding layer.
That quick chill keeps the layers neat instead of blending together.
5. Make the Chocolate Pudding
Whisk together the instant pudding mix and cold milk for about 2 minutes.
The pudding should thicken but still spread easily.
Let it sit for another 3–4 minutes, then spoon it gently over the cream layer.
Spread carefully so you don’t drag the layers together.
6. Chill Until Set
Cover the pan and refrigerate for at least 4 hours.
Overnight is even better.
This is one of those desserts that transforms in the fridge. The layers settle together, the brownies soften slightly, and every bite becomes smoother and richer.
7. Add Toppings Before Serving
Right before serving, pile on your toppings.
I usually go heavy on crushed cookies and chocolate curls because I love texture. My cousin adds strawberries every single time and claims it makes the dessert “balanced.”
Slice into squares using a sharp knife wiped clean between cuts.
Serve cold.
Pro Tips & Tricks
Use Slightly Underdone Brownies
This changed the entire recipe for me. Slightly fudgy brownies absorb just enough moisture from the filling without turning mushy.
Chill Between Layers
It feels annoying when you’re in a hurry, but those quick refrigerator breaks make cleaner, prettier layers.
Don’t Skip the Cream Cheese
I once tried making the filling with only whipped cream. It tasted fine for the first hour, then slowly collapsed into a sad puddle.
The cream cheese gives stability and a cheesecake-like flavor.
Make It the Night Before
Honestly, this dessert tastes better the next day. The flavors settle together beautifully overnight.
Warm Your Knife for Clean Slices
Dip your knife in hot water and wipe it dry before slicing. The cuts come out bakery-level neat.
Variations & Substitutions
Peanut Butter Brownie Refrigerator Cake
Swirl 1/2 cup creamy peanut butter into the cream layer before spreading it.
Top with chopped peanut butter cups if you really want to lean into the chocolate-peanut butter combo.
Cookies and Cream Version
Use vanilla pudding instead of chocolate and add crushed chocolate sandwich cookies between the layers.
This version disappears frighteningly fast at birthday parties.
Mocha Brownie Refrigerator Cake
Add 1 teaspoon espresso powder to the pudding mixture.
I discovered this accidentally while making coffee nearby one morning, and now I make it this way whenever adults are coming over for dessert.
Berry Brownie Icebox Cake
Layer sliced strawberries or raspberries between the cream and pudding layers.
The fruit cuts through the richness in the best possible way.

Serving Suggestions
This dessert shines at casual gatherings because you can make it ahead and forget about it until serving time.
I love bringing Brownie Refrigerator Cake to:
- Summer cookouts
- Eid gatherings
- Birthday dinners
- Potlucks
- Movie nights
- Holiday dessert tables
Serve it straight from the fridge with:
- Hot coffee
- Cold milk
- Vanilla ice cream
- Fresh berries
- A drizzle of warm chocolate sauce
I’ve also eaten it quietly at midnight standing in front of the refrigerator, and honestly, that experience deserves its own category.
FAQ’s
How long does Brownie Refrigerator Cake last?
Store it covered in the refrigerator for up to 4 days.
The texture stays best during the first 2 days, though mine rarely survives that long.
Can I freeze it?
Yes. Slice it first, then wrap individual pieces tightly.
Freeze for up to 2 months.
Let the slices thaw in the refrigerator before serving.
Can I use boxed brownie mix?
Absolutely.
I use boxed brownie mix half the time because it saves effort and still tastes fantastic in layered desserts like this.
Why is my pudding layer runny?
Usually, the milk measurement caused the problem.
Instant pudding thickens best with cold milk and accurate measuring. Give it a few minutes to set before spreading.
Can I make this ahead of time?
This dessert actually works better when made ahead.
Prepare it the night before serving for the best flavor and texture.
Do I need a stand mixer?
Not at all.
A simple hand mixer works perfectly for whipping the cream and blending the filling.
You can even whisk by hand if you’re determined and have strong arms.
Related Recipes:
- Old-Fashioned Snowball Cake Recipe
- Hawaiian Pineapple Cake Recipe
- Raspberry Lemon Cake Recipe
- Chocolate Brownie Cake Recipe
Final Thoughts
Brownie Refrigerator Cake sits firmly in my “dangerously easy” dessert category. Every time I make it, someone asks for the recipe before the pan is empty. It has that perfect combination of homemade comfort and bakery-style richness without requiring complicated steps.
If you try it, don’t stress about making every layer perfectly smooth. This dessert forgives a lot, and somehow it always comes out looking impressive once chilled and topped with chocolate.
And if you sneak a spoonful straight from the pan at midnight, you’ll get absolutely no judgment from me.
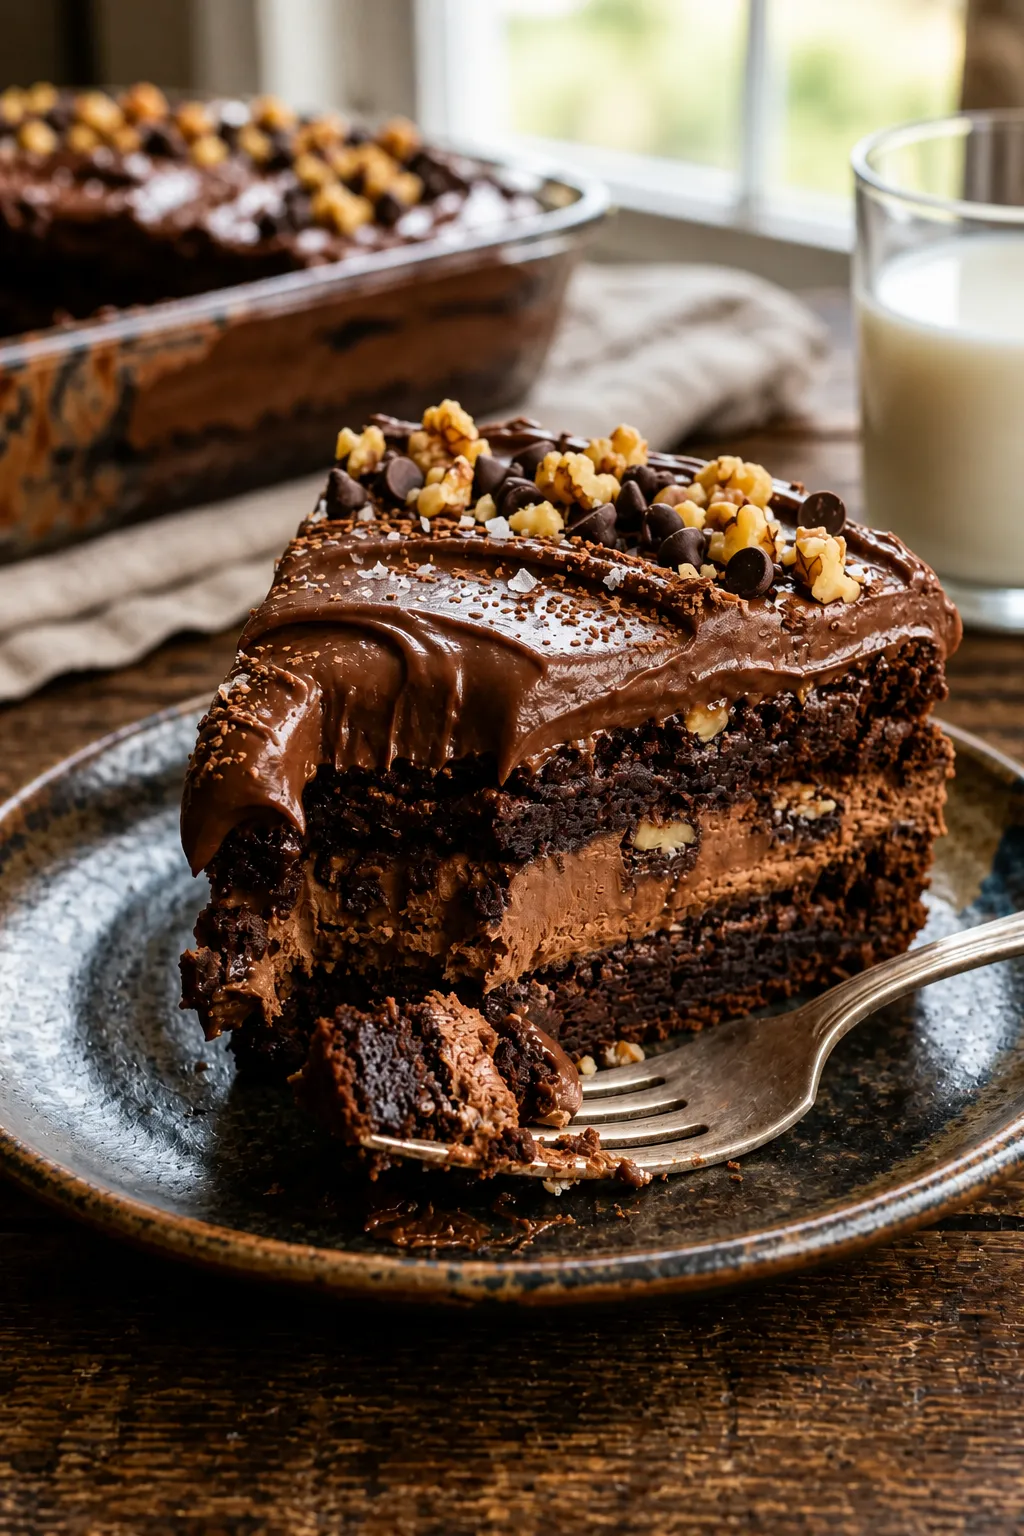

Brownie Refrigerator Cake
Ingredients
Method
- Bake the brownies according to your favorite recipe and let them cool completely.
- Cut the brownies into even squares.
- Beat the cream cheese until smooth.
- Add powdered sugar and vanilla extract and mix well.
- Whip the heavy cream until stiff peaks form.
- Fold the whipped cream gently into the cream cheese mixture.
- Spread a thin layer of cream mixture into the bottom of a serving dish.
- Arrange half of the brownie pieces over the cream.
- Spread half of the chocolate pudding over the brownies.
- Add half of the remaining cream mixture.
- Repeat the layers with the remaining brownies, pudding, and cream.
- Sprinkle chocolate chips over the top.
- Drizzle generously with chocolate syrup.
- Garnish with chocolate shavings and strawberries if desired.
- Refrigerate for at least 4 hours or overnight before serving.
- Slice and serve chilled.
Notes
- Homemade or boxed brownies both work well.
- Chill overnight for the best texture and flavor.
- Add chopped nuts for extra crunch.
- Keep refrigerated until ready to serve.
- Store leftovers in an airtight container for up to 3 days.
- Freeze individual slices for longer storage.